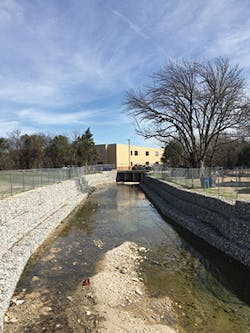
Rocks probably were humans’ first construction materials, and they still may be one of our most important.
Loose, as riprap, or contained in gabion walls, they’re ideal for preventing erosion along water channels, rivers, creeks, lakes, and oceans.
Riprap and gabions both conform to ground movement and connect the flow of water with its surrounding areas. The rocks deflect the impact of the waves, and the gaps between them trap and slow the flow of water, dissipating the energy from the water. Because riprap and gabions are permeable, they allow water to drain freely and prevent the buildup of hydrostatic forces behind them.
And rocks are generally readily available. Broken concrete also may be used as long as it’s clean and free of other materials.
Riprap is best suited for slopes that are 2:1 or less. Because gabions can be stacked into walls, they’re better suited for steep banks and channel linings.
The gradation of the stones influences the resistance to erosion, and therefore affects the design as well as the need for a filter layer or geotextile. A well-graded distribution has a wide range of rock sizes to fill the void spaces in the rock matrix.
The shape of the stones also affects the design. While both angular and rounded rock can be used, rounded stones don’t interlock as well as angular ones. Their thickness should be at least a third of their length. They should be dense and free of defects that would cause them to break down.
A geotextile filter layer should be used with riprap on fine-grained soils, to hold the soil in place. The geotextile prevents the particles from being lost through the spaces between the stones and still allows water from the banks to seep back into the waterway.
Riprap may be placed by hand or with equipment such as a track-mounted backhoe or a power crane with a clam shell or orange peel bucket to a minimum design thickness of 12 to 18 inches. It should be placed from the lowest to the highest elevation to allow gravitational forces to minimize void spaces and help lock the rock matrix together. It should extend up the bank to a point where the existing vegetation or other proposed treatments can resist the forces of the water.
Gabion baskets are box-shaped containers made primarily of galvanized steel wire mesh. They may be coated with PVC or zinc. The mesh, or netting, is either welded or woven. In welded baskets, it is made of high-tensile steel and usually has square or diamond-shaped openings. In woven baskets, it consists of twisted wires and has hexagonal openings.
Gabions are manufactured so the sides, ends, lid, and any diaphragms can be assembled at the construction site. Gabions require diaphragms, or interior walls, when the length of the gabion is more than one and a half times longer than its horizontal width.
The construction of a gabion wall is straightforward: The crew places a geotextile fabric under the first layer of gabions and sets a layer of empty gabions into position according to the contract drawings.
They attach adjoining gabions with lacing wire or another type of fastener along the vertical edges and the top selvedges—the thicker perimeter and edge wires of the mesh, which enable the gabion to withstand stress. They use a corner closure tool to attach the corners. They may stretch the gabions a minimum amount to achieve the optimum alignment and finish.
They fill the gabions with clean, hard stone ranging from 4 to 8 inches on the largest side and secure the lids with a closure tool. They backfill with aggregate, compact, and place additional geofabric over both the gabions and the backfill.
They place a second, empty layer of gabions on the first one, and attach the top of the first layer to the base of the second layer at the front and back. They repeat the process beginning with the first step of attaching each gabion in the second layer to the adjoining gabion.
The two profiles below show how rocks can be used successfully on steep and not-so-steep banks.
Congregation of the Sisters of the Holy Cross River Project
The St. Joseph River meanders through Indiana like an old river, but after heavy rains its velocity can be six miles per hour and feel like a firehose, according to an article in the South Bend Tribune in 2011.
The property of the Congregation of the Sisters of the Holy Cross is on a bluff above the river near South Bend, the southernmost curve in the St. Joseph River, where the river makes a sweeping turn from the west to the north.
“We’re on the inside curve of the river,” says Tom Stimson, grounds manager for the Sisters of the Holy Cross. “There’s constant turbulence.”
Stimson and his staff of four maintain most of the 680-acre property. The campus includes Saint Mary’s College, which has been on the site since 1855; a farm; a 14-acre prairie restoration; a floodplain; and a wetland that formed when the river took out an oxbow on a nearby property.
“The river is always changing its course,” says Stimson. “We’re constantly monitoring changes on the property. We use best management practices for the property owners and for the environment.”
The bluff rises 50 feet or more above the river and its slope ranges from 2:1 to 1:1. The soil is a sandy loam. “It’s easy to get down, hard to get up,” he says.
The river was undermining the bank, which has a more gentle slope, and causing cave-ins. Rain events were causing surface erosion down the bluff. The Congregation was losing land, and sediment in the river was destroying the habitat for fish and other aquatic wildlife.
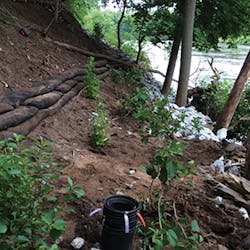
Partially completed upper section of slope with Living Soil Tubes and interplantings of native vegetation above riprap
The project to reduce the erosion and re-create the aquatic habitat began in 2014 and was completed in July 2016. It was a collaboration among the Sisters, the Indiana Department of Natural Resources (DNR), and Hoosier Aquatic Management Inc. in Indianapolis, which uses bioengineering techniques to solve erosion problems on ponds, lakes, creeks, and rivers.
“The Sisters are committed to caring for the earth, and they seek to collaborate with like-minded partners who have the right expertise to find sustainable solutions,” says Amy Smessaert, communications director for the Sisters of the Holy Cross.
One of Hoosier’s partners, Living Log Aquatic Services, which is also in Indianapolis, provided Living Soil Tubes and Living Log vegetated coir logs to prevent erosion on the bluff. Another partner, Northern Natives Erosion Control in Newberry, MI, provided the native vegetation and seed. Hoosier used riprap to protect the riverbank.
Two projects had been done in a similar way in the same area of the riverbank already, Stimson says. One, which was completed in 2013, was to repair a large section that had collapsed and washed away. The riprap has held up well in both.
The Sisters received a grant from the DNR, which funded 80% of the current project. This one, which Stimson initiated and Hoosier carried out, connects to a previous one. The difference, he says, is that the goal of this project was to reinforce the bank to avoid a collapse in the future instead of to repair it.
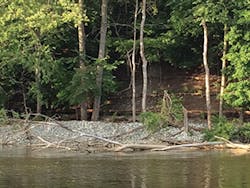
View of the lower section of the completed project from across the river. Limestone riprap keeps the fallen trees and logs in place for aquatic habitat. Some coir logs are visible behind the trees.
The permitting took some time, Stimson says. Because trout and salmon spawn in the river, Hoosier needed a permit for its crew to work in the water. The work in the water itself had to be done around the spawning runs.
The project covered 90 feet along the shoreline, and from the top of the bluff to 10 feet along the river bottom.
“Most of the work was done by hand,” he says. “There was a lot of labor on this one.”
The Hoosier crew accessed the area on the bluff through a space between the trees that was created for the first project. They cleared the area of invasive plants and preserved the desirable ones. They followed the recommendation of the DNR to leave snags, driftwood, and dead trees in place as obstacles to erosion on the slope and as fish habitat at the water’s edge.
They placed a geotextile across the 90-foot swath along the shore, from approximately 10 feet above the river’s normal high-water mark to approximately 10 feet under the surface, which was about 2 to 3 feet deep at the time.
The crew funneled 90 tons of imported limestone riprap down plastic chutes by hand to cover the geotextile. They placed the riprap in a fashion that allowed any snags, driftwood, or dead trees to remain in place as aquatic habitat for fish and other fauna.
For the second part of the project, Hoosier placed a row of Living Soil Tubes, stacked in threes, above the riprap and anchored them in place. These tubes are durable, soil-filled geotextile bags filled with native plant plugs and seed. The vegetation roots through the tubes into the surface of the soil, which strengthens the system as time goes on. The tubes can contour to existing vegetation and terrain and trap eroding soil.
From approximately 10 feet above the riprap to the top of the bluff, Hoosier made horizontal cuts into the slope in approximately five lifts. They placed the coir biologs, which had been injected with native seed during the fabrication process, in the cuts and anchored them with wooden stakes.
“It was almost terraced,” says Stimson.
Hoosier planted native trees, shrubs, live stakes, and perennial plants, including fragrant sumac, red oak, winterberry, marsh milkweed, spiderwort, columbine, and blue flag iris.
The vegetation prevents erosion and increases stormwater infiltration. And because Northern Natives sells local genotype species, the vegetation has the strongest chance of thriving and minimizing the regrowth of invasives.
Hoosier’s last step in the project was to hydromulch the bluff. The hydromulch provided the soil amendment Biotic Earth, water for the new vegetation, and a layer of protection over the disturbed soil.
The only maintenance the project requires is monitoring the riprap for displacement and erosion along the edges of the shore, and monitoring and removing any regrowth of invasive species on the bluff.
“Mechanically, the bluff is holding together well,” says Stimson, “and, eventually, the biologs will make it even stronger. A month after the project was finished, we had eight inches of rain in 24 hours and we had no significant surface runoff. I was impressed that it held up so well.”
The project was good for the environment and the property, he says. “Once you lose a big chunk of your property to the river, you can’t get it back.”
Elmwood Bridge at Franklin Street Project
Even small creeks can cause big problems, especially when they’re in the middle of a dense urban neighborhood.
“We got some really heavy rains a few years ago,” says James Fee, president and owner of Stoic Civil Construction Inc. in Bartonville, TX, which armored the creek with gabions. “We’d been in a drought before that and they caused significant damage.”
Oak Cliff, 6 miles south of downtown Dallas, has been built up since the 1950s and ’60s. Stormwater runs off the buildings and the narrow streets and drains into Elmwood Branch, a tiny tributary of Cedar Creek, which flows into the Trinity River.
While the Dallas area is mostly flat and approximately 500 feet above sea level, a limestone escarpment that rises 230 feet runs through the county. There’s a noticeable uplift in Oak Cliff and nearby neighborhoods.
In 2016, the City of Dallas’ Trinity Watershed Management Department called for the construction of a new bridge over Elmwood Branch at Franklin Street and the installation of gabions along an approximately 400-foot stretch of both sides of the creek prevent any future flooding of the neighborhood and the adjacent public school.
The creek runs under Maria Moreno Elementary School and emerges at a box culvert at the western edge of the school parking lot. It flows approximately 40 feet between two residential properties before it goes under the new bridge on Franklin Street near where Franklin makes a 90-degree turn and becomes Melbourne Avenue.
The civil engineering firm Salcedo Group Inc., which is based in Oak Cliff, designed the bridge and the gabion walls for the channel protection.
“The city wanted to use something that was aesthetically pleasing and easy to install,” says Salcedo Group designer Derrick Chiu, who worked on the project.
Manufacturer Terra Aqua Gabions in Fort Smith, AR, provided the gabions, which were distributed by Hanes Geo Components in Winston Salem, NC. The gabions are of double-twisted woven-wire mesh.
“We have worked with Hanes Geo for several years,” says Fee. “We consider them one of our very best vendors. The staff in their Dallas/Fort Worth and Austin locations are always accommodating and responsive to our needs.”
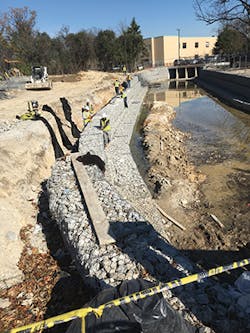
Working on the third layer of gabions.
The entire project took place in 16 weeks between August and December 2016. Stoic Civil Construction built the walls between the box culvert at the school and the new bridge. Stoic is a subcontractor that specializes in the installation of earth retention, soil erosion control, and hard armor products in municipal, infrastructure, and drainage projects.
The walls were built on concrete pads supported by micropiles driven into the bedrock. “From our perspective, the hardest part of gabions is putting the bottom row of the wall in,” says Fee. “They aren’t always done with concrete. We don’t always have the most stable footing.”
The general contractor, McMahon Contracting LP of Grand Prairie, TX, built the bridge and paved the road over it at the same time as Stoic built the walls.
“The streets aren’t that wide, and the site is on a curve,” says Fee. “The access for 18-wheelers was a little challenging. The city allowed us to close the street for almost the entire project, from September to November. Once they got the bridge opened, the traffic was okay and we were out of the way in the creek.”
There also was limited space for staging the materials both for the general contractor and for Stoic. They ultmately shared a residential property owner’s side yard for materials such as the dirt Stoic excavated from the bottom of the creek and later replaced, and the aggregate for the gabions and the backfill.
The completed project with the school and the box culvert in the background
“We were lucky to have a quality general contractor to help coordinate all efforts,” he says. “We’d worked together in the past, so it went smoother. We did favors for each other; for example, if one of us had an excavator onsite, there were times we excavated for them and they would do the same for us. It was good.”
Stoic divided the project into five sections. “Ideally you do as much at once as possible,” he says. “For dewatering requirements, we wanted to find a balance between a large enough work area and a reasonable expense for dewatering. We split the south wall into two parts and the north wall into two parts, and we had a fifth part for the ramp area.”
They used the ramp to move their equipment and materials into the creek. At the end of the project, they worked their way out of the channel from the base of the ramp up to ground level.
Stoic dewatered by building a berm around each working section. When a section did get wet, they used a small pump to pump the seepage downstream and desilted the creek bed. Both companies cooperated on keeping the creek dewatered.
“We caught a lucky break because we had kind of a dry season,” says Fee.
They excavated the creek bed 3 feet to the subgrade and widened it by the approximate volume of the wall plus some backfill. The total cut was just over 1,000 cubic yards.
They used the excavator to drill holes for the 6-inch by 10-foot steel micropiles and to embed them 3 feet into the limestone bedrock.
One of the advantages of micropiles is that they can be driven by small-sized equipment, so they can be used in small areas with limited access. In this project, the micropiles were reticulated, or arranged in a pattern or network. There were two rows of piles along each side of the creek. Each row had a 4-foot spacing, and the two rows had offset centers.
Stoic set the micropiles into the holes and filled in the holes with 6,000 psi grout. The strength of micropiles comes from the steel and the bond that forms between the cement and the surrounding soils. The exposed ends of the micropiles tied into the rebar-reinforced concrete pad, which serves as both a cap for the micropiles and a foundation for the gabions.
Stoic built the formwork for the pads and poured the concrete below the flowline of the creek. The pads measured 6 feet from front to back and were 1.5 feet high.
Crews used imported 4- to 8-inch crushed angular limestone for the backfill for the pads and the gabions. “Not a lot of backfill was needed due to the cut of the slopes,” says Fee. “It averaged approximately two feet.”
They placed a geofabric, also from Hanes Geo, over the pads and the backfill. They set the first layers of gabions on the pads, 1.5 feet below the water line. They backfilled, compacted, and placed additional geofabric over both the gabions and the backfill. In one area, they used a geogrid for additional reinforcement.
They built an additional two layers of gabions, each one stepped back from the one below, added and compacted backfill, and covered both the gabions and the backfill with the geofabric.
The cross section of the wall changed several times, Fee says. The height varied between 9 and 12 feet tall. The width changed from 6 feet thick in the bottom row to 3 feet thick in the top row. The top layer of gabions is level with the top of the new bridge and the box culvert. The walls won’t require any maintenance.
The top row includes an unusual addition: Sleeves for guardrail posts built into the baskets to protect the public. Stoic laid out the baskets, marked out the specific locations for the sleeves, built the sleeves, and set them in the rock, and then put the guardrail posts in the sleeves. “We’ve only done that a few times in past,” he says. “That added quite a bit of time.”
A large concrete drainage pipe under the bridge takes stormwater off the street. He cut it flush against the gabions.
“The project took a little longer than usual, but it went really well,” says Fee. “It looks good and the city is happy with it. We like building walls, especially when they’re to keep the community safe.”
